Showing posts with label diy. Show all posts

Thursday, January 15, 2015

Ahi Tuna Poke Recipe

This recipe is so simple and so delicious, you have to try it!


Ingredients:
  • 1 lb fresh Ahi Tuna steaks. (Make sure you get sashimi grade tuna as it is to be eaten raw. I get mine from Sprouts)
  • 1-2 avocados
  • Soy sauce
  • Sesame oil 
  • Sesame seeds
  • Sriracha
  • Sea Salt
  • Sushi rice
  • Rice wine vinegar
I use all of these ingredients to taste.

Cut your tuna steaks into small cubes.  A sharp knife is crucial so you do not mutilate the fish.  Make sure you cut across the grain so the tuna stays in nice little chunks.
 
 Beautiful.  Since we are marinating the tuna, I use this amazing beast: Vacu Vin Marinator. The Vacu Vin significantly cuts marinating time.  A regular tupperware also works, but you have to let it sit in the fridge for a few hours.

 Begin adding your seasonings. I think I used 1/4 cup of soy and 3-4 TBS of sesame oil.  Add the Sriracha to taste (or leave it out if you don't like spicy things) and a sprinkle of sesame seeds.  I never learned to cook with actual measurements, so you can always taste as you go. Give one small grind of salt on top and place your container in the fridge.

Start cooking your sushi rice. Once it is done, allow to cool for a few minutes before folding in about 1/4 cup rice wine vinegar per 2 cups of uncooked rice.

Once finished, cube the avocado. Start with a bed of rice and combine your tuna and avocado on top.

Fast, easy, and delicious. This stuff doesn't keep in the fridge but for a few hours, but it's so good I don't think it will be a problem!

Monday, July 28, 2014

DIY Aden + Anais Burpy Bibs: The best burp cloth/bib pattern

I hear babies are messy.  My friend told me if there is something to stock up on, it's burp cloths and bibs. I give to you the Burpy Bib... a tutorial for an item that does double duty, and looks cute to boot.
Aden + Anais makes Burpy Bibs, but at $10 a piece I wanted a different option. This easy-to-make version  costs next to nothing, and can be a beautiful, custom baby gift.

DIY Aden + Anais Burpy Bibs | House of Hibbs

Start by printing off the pattern from The Piper's Girl. She has a great one for free!

Here is what you will need for this project:
  • 1/3 yard of fabric for the front. (I have used printed duck cloth, gauze, cotton... anything that will wash well)
  • 1/3 yard of fabric for the back. (Use any soft, easily washed fabric. I like to use flannel.)
  • 1 Snap
  • Pattern
  • Sewing Machine
Lay out and iron your fabrics. There is nothing worse than a giant crease when you are trying to sew.

Pin the pattern onto each piece of fabric and cut. I'm going to apologize for the lovely photography in this tutorial series.  3 days away from my due date, and I couldn't care less about the lighting.

Lay your patterned fabric wrong-side up on top of your second layer and pin in place.  Sew around the edge with a 1/4 inch seam, but be sure to leave about 1.5" so we can turn the fabric right-side out.

Before turning the fabric, make little notches around the bend of the sewn edge.  This will keep the fabric from puckering when we turn it.

Turn your fabric right-side out by pulling it through the little hole we left.  Give the fabric a good iron to flatten the edges.

Look at those ironed edges!

Sew around the outside with a 1/4" seam.  This terrible picture shows a lovely zig-zag stitch that I used. Why not make it fun when I am cleaning up baby mess at 3 in the morning!
Add the snap where the pattern indicates.  There isn't a picture for this, but it is pretty self explanatory.

All done! Each one of these took me about 30 minutes.  Nothing flashy or fancy and surely not a perfect sewing job, but they get the job done!


As burp cloths, they have a nice contour around your neck so they stay put. As bibs, they wrap all the way around baby to keep those cute little outfits clean of food and spit up.  Hooray for dual purpose!

Monday, June 16, 2014

Brownie Bomb Recipe

You can just go ahead and thank me now. This recipe is out of this world!
Brownie bombs have been my go-to party contribution for the past while.  What's not to love... cookie dough, brownie, chocolate...everything about these little guys is amazing.  So here is what you need:

Ingredients:
  • ¾ cup softened butter
  • ¾ cup brown sugar
  • ¼ cup white sugar
  • 2 Tbsp milk
  • 1 tsp vanilla extract
  • 2 cups all-purpose flour
  • Pinch salt
  • 2 cups miniature chocolate chips, divided
  • 2 boxes fudge brownie mix, baked and cooled
  • 1 package chocolate almond bark
For the purpose of the tutorial, I did a half batch of this recipe, which yielded about 16 brownie bombs.

Make the brownies per the recipe on the box. They need to be totally cooled before we can wrap the cookie dough, so I normally do this an hour or so before.

Now we need to make the dough. Cream the softened butter with the sugars until light and fluffy. Stir in the milk and vanilla extract.  I always add an extra teaspoon or two of vanilla because I love the way it adds to the dough.  Combine your salt and flour together, and slowly mix it into your dough.  You may need more or less flour to get the right texture.  It should be firm and together, but still a little on the wet side.  Gently stir in 1.5 cups of the mini chocolate chips. We will need the last half cup for the last step.

This dough is made without egg, so it is safe to eat at any point. I have made just the dough before and used it as a "dip" with graham crackers. I highly suggest this as well.

 Roll your cookie dough into balls about 1 inch in diameter.  Throw them in the freezer for about an hour until they get nice and firm... the colder they are, the easier the next step will be.

 Cut the brownies into squares about 1.5-2''.  It's hard to see in the picture, but I always cut away the hard edges since they are hard to wrap around the balls.  Flatten the brownie with your hand so it is nice and flat.

Put one of the frozen cookie dough balls in the middle of the smushed brownie.  Wrap the brownie around the dough ball until it is mostly covered.  It doesn't need to be perfect since we will be covering it in chocolate!

Once all of the frozen cookie dough balls are covered in brownie, throw them back in the freezer.  Again, freeze the bombs for at least an hour.

Prepare the chocolate almond bark per the package directions.  I usually use a double boiler, but a microwave works just fine.  Be careful not to scorch your chocolate, or you will have lumpy brownie bombs.

After you dip the bomb in chocolate, lightly sprinkle the tops with mini chocolate chips.

There you go!  Like I said... these brownie bombs are amazing. Store them in a sealed container in the fridge, and they will last for about a week. I prefer them to sit on the counter about half an hour before serving so the cookie dough gets nice and soft.

I hope you enjoy them!

Wednesday, June 4, 2014

5 Minute DIY: Onesie Applique using the Silhouette Cameo

I have plenty of plain, boring onesies for Miles that I think needed some sprucing up. Here is a quick and easy tutorial using my favorite machine... The Silhouette Cameo.
5 Minute DIY: Onesie Applique using the Silhouette Cameo | House of Hibbs 
What I love about the Silhouette is that I can make custom shapes and use it for anything... clothes, scrapbooking, vinyls... the list is endless.

 You need the following for this project:
  • Onesie (Here I use a white Gerber 6-9 month onesie)
  • Fabric of your choosing
  • Heat and Bond
  • Silhouette
Start by measuring out your fabric and Heat and Bond. I use sheets of 9''x11'' of each. Make sure and iron your fabric before you lay the Heat and Bond! Put the Heat and Bond transfer side down on top of the fabric.

Iron according to the package instructions. With the type I chose (Permanent, non-sew Heat and Bond) I pressed firmly for 3 seconds until bonded.

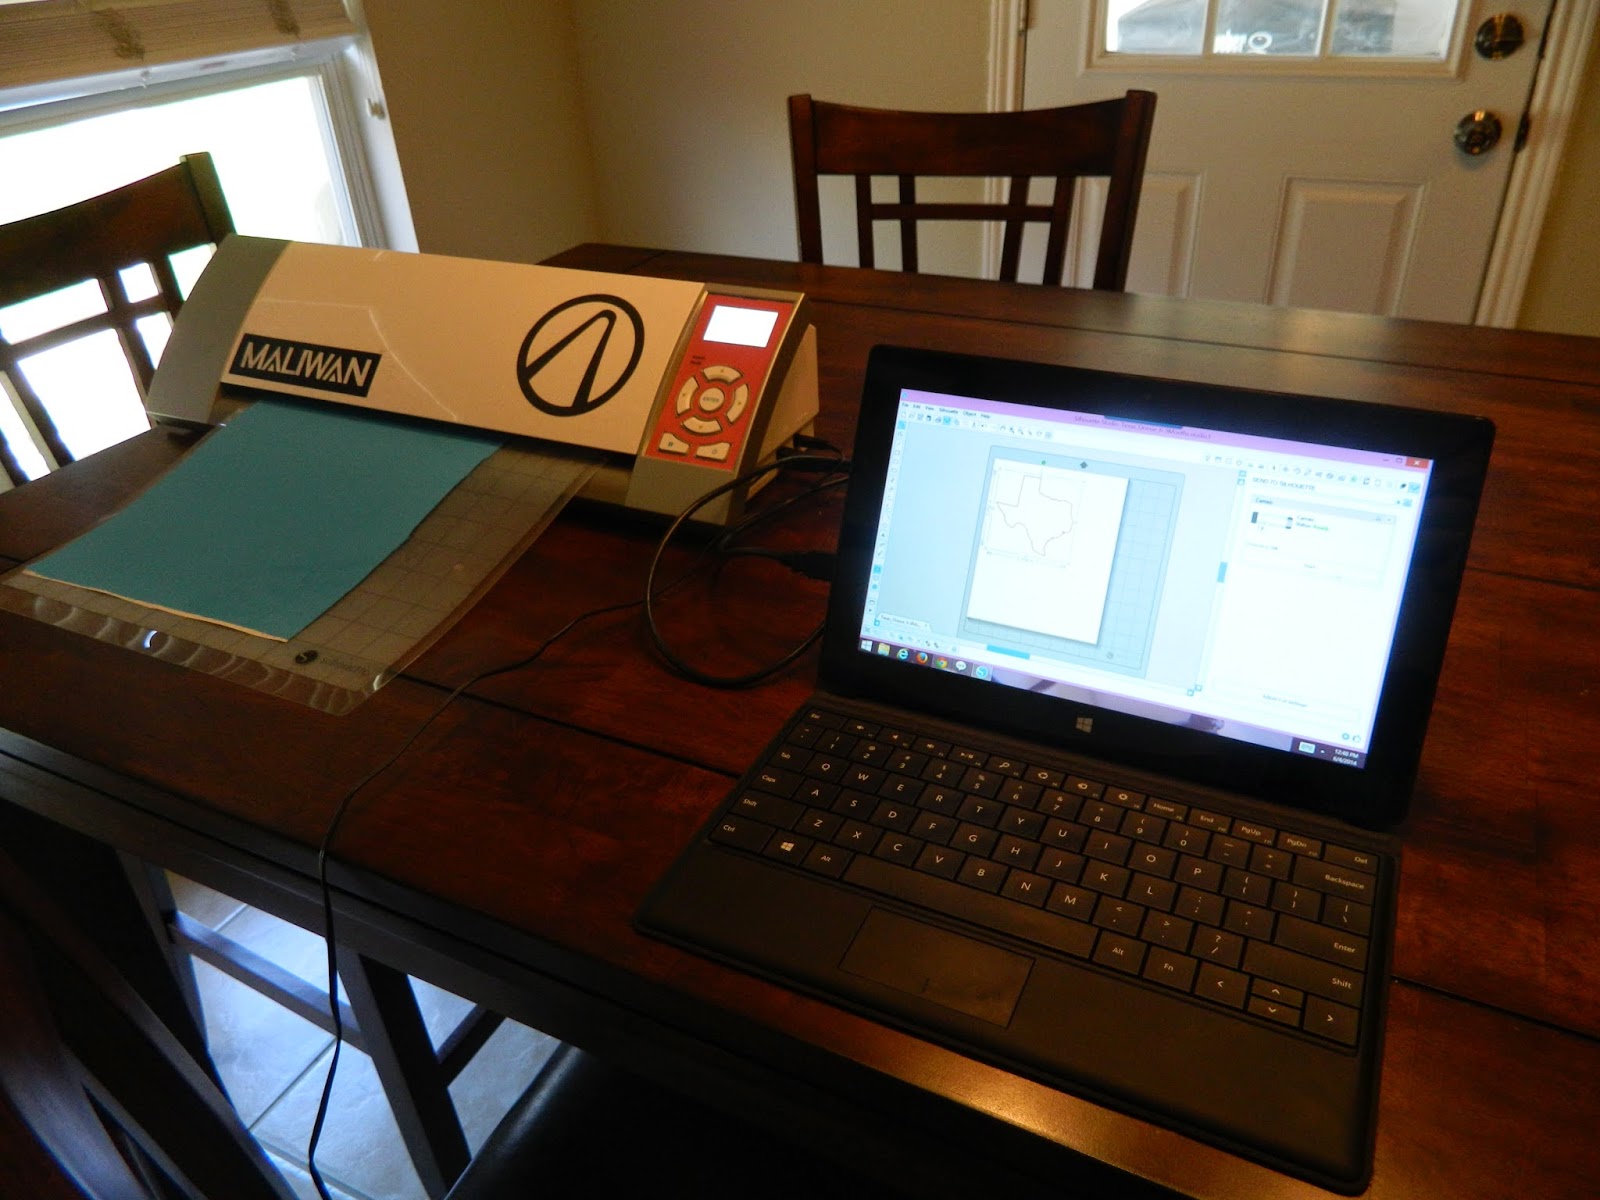
In the Silhouette software, choose your shape. I picked out an outline of Texas... super easy shape to cut. I've done many projects with words and more intricate shapes, but for the purpose of today I picked a simple one. Make sure you set the size of you page (9''x11") and size your design so that it will fit on your surface. (I used a shape about 5''x5'')

I've put a picture up of my cut settings. I have found that using the Fabric setting with a Double Cut is the most efficient. If you are using a heavier fabric (like canvas) make sure and adjust accordingly.

 
Here is my wonderful workstation. Make sure you have enough room behind your Silhouette so nothing hits the cutting mat.

Here is the fabric after it has been cut. Hard to see anything, but when you carefully peel off the rest of the fabric...

 Magic! A perfectly cut little Texas.

Carefully peel the fabric away from the white backing. The fabric applique will have a little sticky texture on the back. This is the side that will go down on the onesie.

Place and iron as directed by the Heat and Bond instructions. (8 seconds for me). Since I used permanent Heat and Bond the onesie can be run through the washing machine with no damage to the applique.
There we go... a 5 minute project that turns a plain onesie into something a little more interesting.

Friday, May 9, 2014

DIY - Tissue Paper Pom-poms

It's less than 12 weeks until Miles will be here! Naturally I have been in full-on nesting mode. The nursery is painted (and beautiful thanks to my husband and daddy) but it is still needing some pops of color.
Today's DIY is a really easy one. These are going to hang from the ceiling, but can easily be used as an inexpensive party decoration.

DIY pompom_House of Hibbs
Materials:
  •  4-6 pieces of tissue paper
  • Breadties (I used two to make sure everything was really secure)
  • Scissors
Start with 4-6 sheets of tissue paper. The more pieces you use, the thicker your pom-pom will be. I used 6 for this one.

 Cut your tissue paper into fourths and lay the pieces on top of each other. There is no need to measure and make sure they are perfectly even... they will still turn out great!

 Accordion fold the pieces together. I should take this time to note that I am in no way a photographer...

 Once everything is all folded, use the breadties to secure the tissue paper in the middle. It should look like a giant piece of farfalle at this point.

 Trim the edges so they are mostly even. I like to round them out, but you can just as easily trim it straight or make it come to a point to slightly change the way the pom-pom looks.

 Now for the fun part. Carefully separate each individual piece of tissue paper. Make sure the tissue paper does not tear... it's hard to hide tears in the final product.

 Halfway there!

Once you finish both sides, pull and crunch the tissue paper until it is round and puffy.

That's it! The whole thing takes maybe 5 minutes, and is a great, cheap little decoration.